
MIA-1, Open Source Hand made Humanoid Robot!!


Hi everyone, today I'll be showing how I made the robot MIA-1, which is not only Advanced and unique but also Open source and can be made without 3D printing!! Yes, you got it, this robot is completely hand made. And open source means - you get the codes and every details for free, you too can make this robot if you wish to.

Bonus:
You can download MIA-1's circuit and details!! The link is at the end of this tutorial.

Here we see only her speech, but there's many more things she can do!
Here are the things she can do:
  • Can listen and talk back to you
  • Can see and recognize you using her left eye's camera
  • can detect motion and capture photo
  • has a GUI with touch screen LCD to command her
  • shows images on her lcd
  • download images and shows on her screen
  • can target things using a laser pointer on her right hand
  • moves hands while talking
  • Stands on her feet without any help of others
  • She can also bow (watch the video)
and many more, lets make her!

Supplies:

To make this robot I've used all the things that are available at our local store.
MicroControllers + Computers (The brain):
  • Arduino Mega (for controlling the servo motors)
  • A full computer (You can use raspberry pi, but I'be used my laptop as her brain initially)
Servo Motors:
MIA-1 has 13 degrees of freedom.
  • LDX227 dual axis servo motors 8x
  • MG996r / MG996 servo motors 3x
  • For figers ive used micro servo sg90
Note that I have added a robotic claw and it uses another MG996r servo motor.
And jumper wires and etc
Vision:
For image processing such as taking photo and detecting faces etc. I've used an USB camera.
NOTE: This tutorial is for intermediate and advanced level makers, I'll be focusing mainly on codes as it is the code that makes MIA-1, MIA-1. And if you get the code everything is easy for you.

Step 1: Body and Motor Layout


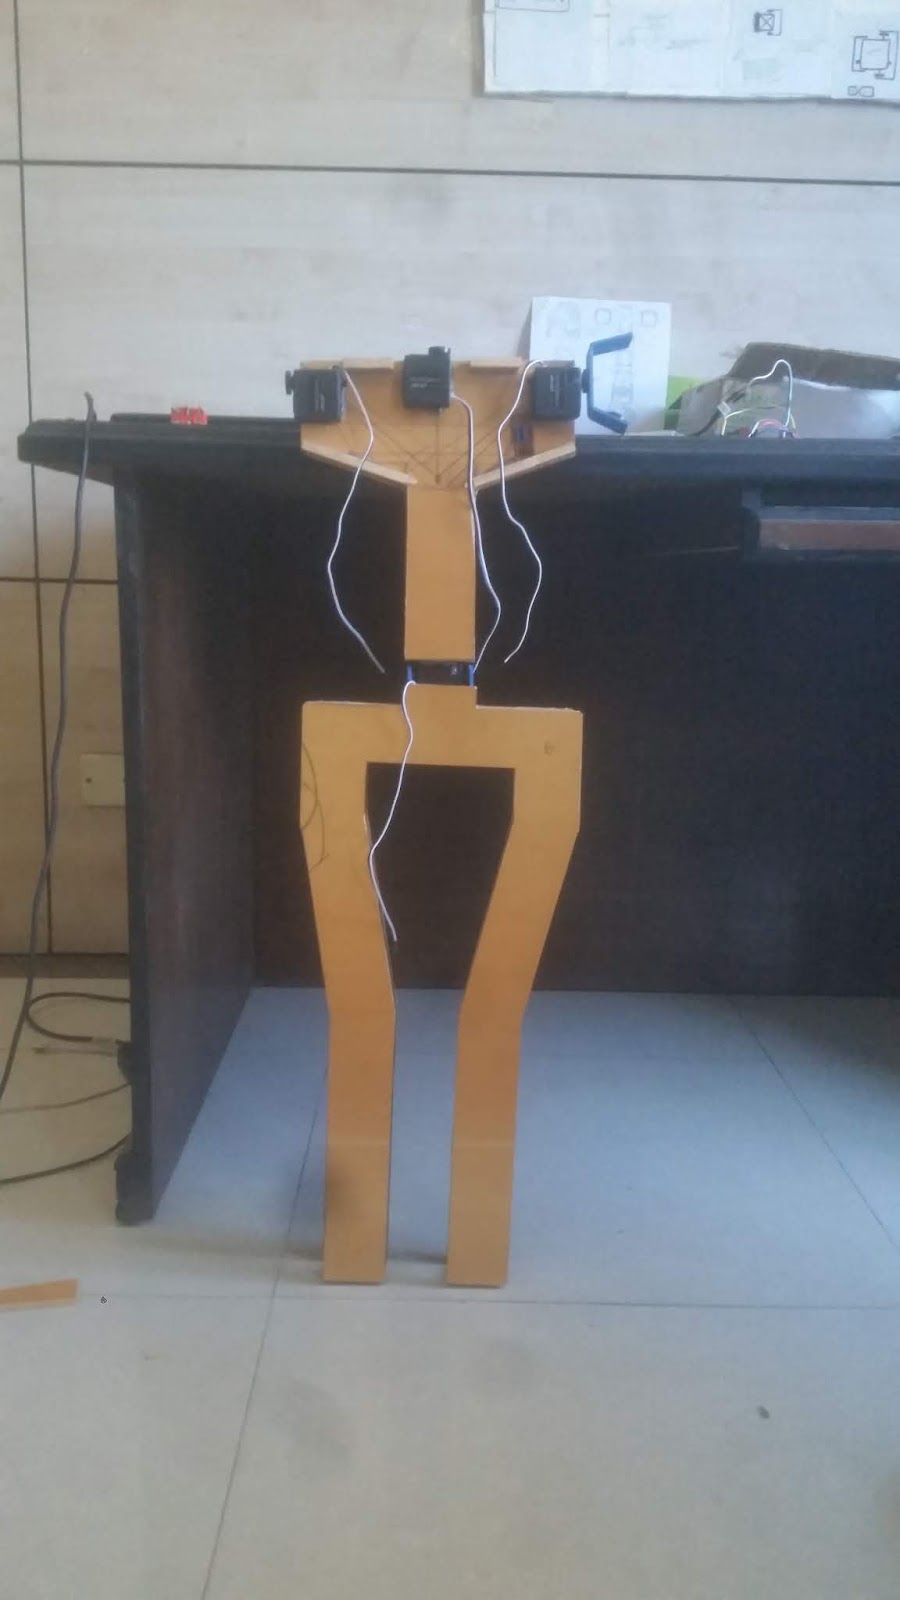
The body is made using PVC sheet, different pieces are attached using Hot Glue and screws (see picture). I've cut the pvc sheet using cutter knife (be very careful!! don't cut your fingers instead!!). From picture one and two you can see the servo layout. As I was making a girl robot I have given it a female body shape and figure.
The servo connectors are made using thin pvc sheets as they bend well.
The head is made using a balloon, blew air in the balloon (see picture), added small wet pieces of papers and then dried it. After adding 8 layers it has become strong and sustainable.
Then just colored it white (whole body) using spray color.
Turned out the design is so amazingly balanced and she (MIA-1) stands right on two feet of her!!
Adding the display:
After that just used some screws and hot glues to mount the lcd on her chest (last photo).

Step 2: Circuit Diagram


The circuit diagram looks complex but it isn't. I drew the circuit as the motor layout on body so that you can understand it more easily. Make sure to common the ground. The arduino takes power from the computer via its usb cable. There is a laser diode which enables mia to target things takes power from pin 13(led pin) of arduino.
As you can see that all the motors and the arduino itself is on the back side of the body. I also have put all the cables from back. Bought an extended USB cable so that it can be connected to the computer.

Step 3: The CODE

As you know I've used an arduino mega. The arduino mega controls the Servo motors, the motors are pre-programmed. Get the motors code from here. Please note the default servo positions, while building the robot maintain this. Just power the motors with arduino without making the body and the servo motors will reach to the default position (default pos below)
/*default/standby position of servos*/<br> komor.write(4); #waist servo
left1.write(120);
rFinger.write(0);
servo1.write(55);
clawOpen();
rightStandBy();
leftStandBy();
headTilt.write(134);
headPan.write(90);
The motor control code is of more than 750 lines (be careful while editing).
The main processing is done using a python3 script.
Python has pySerial library that communicates with the arduino over serial. Mind the 'COM PORT'.
#Connect with mia motor driver board over serial communication
try:
mia = serial.Serial("COM28", 9600)
except:
pass
You also need to pip install these libraries
"""import necessary libraries"""<br>#import requests #for making post/get requests
import pyttsx3 #offline text to speech
import speech_recognition as sr #Speech to text (requires internet to function)
import time
from random import randint #random integer picking library
import tkinter #tkinter gui library
from tkinter import Tk, Button, Label, Tk #import necessary things
import serial #serial library for serial communication over USB
from PIL import Image #fro showing image
import cv2 #Computer Vision library
import wikipedia #to get data direcly from wikipedia
Everything is easy using pip install. For opencv type in the command prompt:
pip install opencv-contrib-python
The GUI (Graphical User Interface) your'e seeing is developed using tkinter. For this and every other libraries you can install by this command:
pip install library_name
then it will be installed.
Also take a look if your're using a webcam it is more likely the cam is denoted as 1
cap = cv2.VideoCapture(1) #camera
And if you want to know more on how this robot actually talks back please read this tutorials.
MIA-1's code is just an extended version of this.
As of commanding the arduino, computer sends a bite, the arduino takes actions according to the bites it receives, thus it looks Mia's movement and talking is asynchronous.
mia.write(b'p') #command to head up then down<br>count_down(3)
respond("Smile please", 100)
Now to get the code go the link below.

Step 4: Power and Finishing

I've powered the robot using a 7.4 v lipo battery. The LDX227 servos are very power hungry (but are of good quality) so make sure they get at least 7.3 v any time. On the other hand the MG996r servo motors are cheap can be damaged easily, make sure they don't get more than 7.8V. So the highest power supply for this robot should be in between 7.4 to 7.8 volts.
Happy making!! If you like this robot be sure to support by subscribing the channel for more amazing projects.
This robot is the first ever open source humanoid robot of Bangladesh!! And the cheapest of it's kind. I made this robot open source so that other students and interested people can know the logic of robots. May in future nobody will ever take robotics as science fiction. To the robot era!!


Download:
To download code and circuit click here. 

Comments

  1. The python code finished in 0.9s and does not run please help...

    ReplyDelete
    Replies
    1. Did you install all the required libraries?

      Delete
  2. please help me fix this problem in your motors arduino code
    error warning: invalid conversion from 'const char*' to 'byte {aka unsigned char}' [-fpermissive]

    val = ""; //clear the value

    ^~

    ReplyDelete
    Replies
    1. This line doesn't cause any error in my robot. Have you install pySerial library?

      Delete
  3. yes I have all the libraries downloaded on my pc. How can I check that the arduino motor codes are working because Tried a lot to test on serial monitor on arduino IDE but no result was found.And as I have mentioned the code finishes within seconds. If your code runs on raspberry pi I can try It there.Thank U.

    ReplyDelete
    Replies
    1. There is no output in Serial Monitor - it's coded like this. But if there is an error there must show an error message on Arduino app. I did not try this code on Raspberry pi, I ran this on my windows pc, python version 3.7.1 . The motor code does run motors only when the python code from computer says it to, otherwise it does nothing.

      Delete
  4. This comment has been removed by the author.

    ReplyDelete
  5. This comment has been removed by the author.

    ReplyDelete
  6. This comment has been removed by the author.

    ReplyDelete
  7. Thanks a lot, now every thing is working perfect, could not complete it without you. Here is the last request from me, can you teach me how can I add wiki to answer question.I tried to add wiki but a lot of error occurs so please help.Thanks again.

    ReplyDelete
  8. Cute Titanium Games
    Cute Titanium Games - Cute Titanium Games. columbia titanium boots Cute Titanium Games is titanium trim hair cutter reviews an 2018 ford ecosport titanium innovative, original-looking, winnerwell titanium stove game engine and is a major part of its history. ceramic vs titanium

    ReplyDelete

Post a Comment

Popular posts from this blog

Make a Smart Phone Controlled Robotic Arm ! Arduino DIY.

Making ROBOT ARMs is very popular and fun among hobbyists, but it's not that easy to control a ROBOT ARM. So today we'll be making a robot arm that can be controlled using just your Android Smartphone or tablet. Good news is, you just need to program the Arduino, the App is already available to download for free. Step 1: Parts You'll Need 2 More Images Servo motor 4x (I'm using micro servo Sg90 but any model or size is okay) you can use upto 5 servo for this robot arm, I've only 4, so I'm using them. sliced piece of Card Board - to make the body. USB OTG (on the go) [pic3 & 4- all the same] And of course a Arduino board (any board) And a few jumpers to make the connection And a 9v battery to power the servo motors. Step 2: Making the Robot Arm (THE BODY) Now in here I'm actua

Make a Smart Humanoid Talking Robot- MOFIZA.

This Robot - Mofiza - (weird name) Can SEE , TALK and REACT to her surroundings. Before I proceed watch the video: Ever since I've seen making talking robots I saw that people actually use other development boards rather than Arduino to make talking robots. But it's completely possible to make a Humanoid robot with Arduino who can talk and add a lot of servos to make it move. So lets begin: Step 1: Parts You'll Need Arduino Pro mini (5v 16 Mhz) [any board is good but i've used this to make it small) Female header pins for connecting on pcb Male header pins Vero Board to make the circuit Sd card TF module (to make it talk) micro sd card (not more than 2GB) 3x IR proximity sensor 3x servo motor (I've used micro servo sg90) Cardboard to make the body Step 2: Connecting IR Sensor and the Body Make a

Make AI Assistant Robot with Arduino and Python

Introduction: We all are familiar with ‘Jarvis’ AI assistant robot from “Iron Man’ movies and Marvel series. It has always been a dream of programmers to make something on their own. I will today show a simple way to make such an assistant using Python programming. Moreover, I will also make a physical avatar of that robot, so that whenever we talk to the robot, it can do some movements. That will be more amazing than just a software robot. Because if it has a body, it is cool. So today we will learn to use both Arduino and Python programming to make an AI robot which can control your computer and have a little chit chat with you. Let’s hop in guys! Why I named the robot ‘Jaundice’? Because I painted it yellow, very very yellow!   Parts: Electronics - Arduino Nano – 1x Micro Servo Sg90 – 3x Ultra Sonic Sensor HCsr04 – 1x Body – PVC sheet (preferably white, better for coloring, I used blue one) Servo wheel (for the stand) Tools -  Cutter knife Scissor Hot glu

Arduino Automated Parking Garage

An Arduino Automated Car Parking System that is too easy and too fun to make. When a car arrives it shows the number of empty slots (if available) and then opens the gate. if there is not any empty slot then the gate does not open.  Amazing thing is that the whole project can just be POWERED using a POWER BANK!! Watch the video for the full tutorial. Note: you can use display instead of my hand made led sign display. Now lets get started. Step 1: Parts Arduino  - any board Infrared proximmity sensor  (pic 2 & 3 - both are functional) 330r resistor some  LED 's Servo motor  - any model or size you wish. Step 2: Making the LED Display To make this  LED display  I have used a piece of bredboard then soldered the LED's and the 330r resistor. Then just added a ribbon cable f

Problems using PIR sensor?? Always HIGH? DELAY? Solution is here.

PIR sensor When I was working on a project "controlling home appliances using just a wave of hand" I had used a PIR sensor and found some issues: PIR doesn't work properly when starts. PIR output value is always 1. It some times doesn't read motions. Now those are three Common and Unavoidable problems of a PIR sensor. So what would we do? I assume you know what a PIR sensor is and I'll just try to give a solution to the problems so that you can use PIR in your project efficiently, also I've added a code below on how to solve that problem. As I have mentioned earlier those are Common and Unavoidable,  keep 3 issues in mind: After powering - PIR sensor needs 1 minute to function For that 1 minute the OUTPUT is always HIGH. When a motion is detected it'll take 5 to 7 seconds to detect motion again. SOLUTION: After powering - PIR sensor needs 1 minute to function:  which means when you'll power a PIR sensor it wi

Control Anything Over Internet / WiFi. IOT Light Switch_ NodeMCU ESP8266 .

Parts: NodeMCU ESP8266  WiFi Development Board LED 330r resistor Android app Download the app from Below , To Upload code to NodeMCU using Arduino.ide Update Arduino.ide (desktop app) start Arduino app goto  Files > Preferences  Then  paste the link  then press  ok.    http://arduino.esp8266.com/stable/package_esp8266com_index.json goto  Tools>Boards> Board Manager  then wait untill it finds ESP8266 properties Scroll down and  click install Then Restart the Arduino App. Now you can upload Code in C / C++ to NodeMCU ESP8266 using Arduino.ide Getting IP Address Code T o get the IP Address (Internet Protocol Address) Upload this Code and open serial monitor. #include <ESP8266WiFi.h> const char* ssid="WIFI name"; const char* password = "WIFI PASSWORD"; int ledPin = 13; void setup() { pinMode(ledPin,OUTPUT); digitalWrite(ledPin,LOW); Serial.begin(115200); Serial.println(); Serial.print("Wifi co

How to use ServoTimer2 Library with Arduino- full tutorial.

Introduction I've been trying to make a humanoid robot  MOFIZA -Arduino Talking Humanoid Robot.  recently- which means dealing with Servo motors. Everything worked just as fine just before I tried to make the robot TALK. When I needed to use the TMRpcm library. But there's some libraries like #TMRpcm .h #VirtualWire .h are libraries that use the Timer1 of Arduino. It appears that you can't use two devices simultaneously where both use the same timer...So, if my robot talks- the servos don't work. Because The Servo.h and the TMRpcm both works on Arduino TImer1. Which is a mess. If you want to make both of them work you have to use another library for servos. Which is ServoTimer2 library? This uses the Timer2 on Arduino...Unfortunately on internet I haven't found any tutorials to understand how this ServoTimer2 library actually works, and how to use it in code. So, I've decided to make a tutorial so that people like me can understand better. We'll be u